tedd1
-
Posts
512 -
Joined
-
Last visited
Content Type
Profiles
Forums
Events
Gallery
Store
Everything posted by tedd1
-
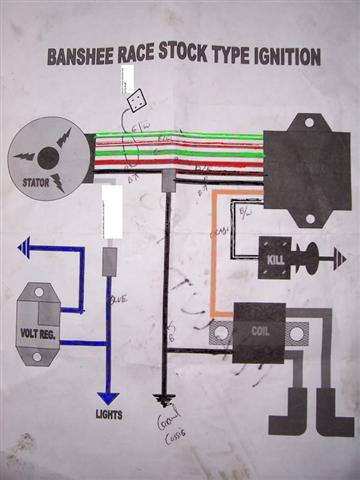
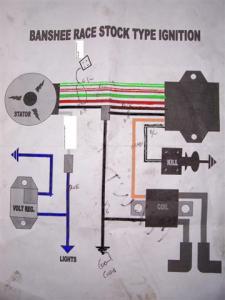
I looked for this on the web and couldn't find it. It seems the original page no longer exists. If there is a problem with posting this in this manner or if this has already been posted somewhere, please delete. I just copied and pasted it in it's entirety to Word several years ago.... Originally written by Ben Boal in 2004 Banshee Electrical FAQ Everything you ever wanted to know (probably more) about Banshee electrical systems! While the specifics listed are based on the Banshee's electrical system, the principals remain the same and are similar for other simple 2-stroke motors (as always a service manual will provide you with specific testing values and is a sound investment). I'd like to thank all the past and present members of BansheeHQ.com for all their valuable help and input. I've tried to cover as many electrical issues as possible, from the most basic to the more complex, so some of you may want to skip ahead, and others are welcome to add anything that I've missed or have yet to learn. There are many pictures so make sure to let the page load. First off, here's an illustration of a typical Banshee stock electrical system, later year models will have additional wiring for brake lights: Next, here are some electrical specifications for an '87 and up Banshee: Stator resistance: Ignition coil should be 13.7-20.5 Ohms (red to green wire) Pickup coil should be 94-140 Ohms (white/red to white/green wire) Lighting coil should be 0.26-0.38 Ohms (black to yellow wire) Coil resistance: Primary coil should be 0.28-0.38 Ohms Secondary coil should be 4,700-7,100 Ohms Pickup coil gap: 0.015"-0.020" Spark plug: NGK BR8ES Spark plug gap: 0.7-0.8mm (0.028-0.032") Finally, here is a link to some good basic explanations of how the electrical system functions in a car, many of the principles are the same: http://auto.howstuff...tion-system.htm Q & A, The Basics Q#1:Why is a functional electrical system important? A#1:At worst, it flat won't run. Maybe worse, it'll run like crap intermittantly, often for no apparent reason or without any common symptoms. However, learning a few basics will help you solve an electrical problem quicker and save you alot of grief. Q#2:What are the parts of a Banshee electrical system? A#2:I'm glad you asked. The basic Banshee electrical system consists of a stator, stator plate, flywheel, woodruff key on the crankshaft where the flywheel mounts, pickup coil, CDI, coil, spark plug wires, spark plugs, voltage regulator, taillight, headlights, key switch, a handlebar-mounted light & kill switch, and a wiring harness. Most Banshees (as equipped from the factory) also have TORS (Throttle OverRide System), and later models (approximately 2003 and later) have brake light systems. Q#3:What is a "stator"? A#3:A Stator is at the heart of the electrical system, whose job it is to provide electricity to the rest of the electrical system. On a Banshee, the stator is found on the left-hand side of the bottom end of the motor, by removing the stator cover (black plastic on a stock motor) and flywheel. The stator itself is a doughnut-shaped device made up of several poles on the perimeter wrapped with copper wire, and has four wires going to the wiring harness. It is held onto the aluminum stator plate with three screws, and subsequently the stator plate is secured to the engine's bottom end with three bolts. Here's a pic of Meat's stock stator and plate (the stator poles are coated with red liquid electrical tape), after removing the flywheel: Q#4:How does the stator work? A#4:The stator produces electricity by converting the kinetic energy of the rotating flywheel into electrical energy. In English, this means that as the motor spins, the flywheel connected to the crankshaft turns the flywheel around the stator and produces electricity. Similar to an alternator in a car (or a generator/magneto in other applications), the stator and spinning flywheel produce current for the ignition and lighting system. I should note that the ignition and lighting parts of the stator are separate, while both perform the same job of producing electricity, the ignition coil of the stator is a different part of the stator itself than the lighting coil. Q#5:What's a "stator plate"? A#5:The stator plate is a cast (stock) or machined (aftermarket) aluminum plate that the stator and pickup coil bolt onto, and is then bolted to the bottom end of the motor. Here's a pic of Superchicken's stock stator, stator plate, and pickup coil: Q#6:What does the stator plate do? A#6:The stator plate holds the stator in place on the bottom end of the motor centered on the crankshaft so the flywheel can spin around the stator, and also has a mount for the pickup coil. Aftermarket stator plates either provide slotted mounting holes where the stator plate bolts to the motor, or have adjustable pickup coil mounts, allowing the ignition timing to be advanced or retarded (see Q#54-56). Here's a pic of Meat's Trinity adjustable stator plate next to a stock one: Q#7:So what is a "flywheel"? A#7:The flywheel spins around the stator to produce electricity, and also tells the CDI where the pistons are relative to TDC (top dead center). Also found on left-hand side of the bottom end of the motor, the flywheel fits over the stator. The flywheel is mounted to the tapered end of the crankshaft with a 19mm nut and lockwasher, and is "indexed" to the crankshaft with a woodruff key (see Q#9). Located on the perimeter of the flywheel are two raised, rectangular tabs that the pickup coil uses to signal the CDI when to fire the spark plugs. The inside of the flywheel is magnetic, which in conjunction with the stator creates a magnetic field and then electricity. Here's a pic of Meat's flywheel: Q#8:How does the flywheel work? A#8:Together with the stator, the spinning flywheel creates current for the ignition and lighting circuits. Together with the pickup coil, the flywheel tells the pickup coil where the pistons are so the CDI can fire the spark plugs. As the flywheel rotates, the pickup coil senses the location of the tabs on the oustide of the flywheel, and sends a pulse to the CDI. Another function of the flywheel is to store inertial energy; by spinning on the crankshaft the flywheel's weight can affect how fast engine RPM rises and falls. A relatively heavy stock flywheel will keep the crankshaft spinning longer than a lightened flywheel so when you let off the throttle and then hit it again there is less "lag" between the time that the motor hits it's "powerband" (or peak horsepower RPM) and the RPM that it was spinning when you let off the throttle...the downside of a heavy flywheel is that from a very low RPM it takes longer to hit the powerband. Conversely, a lighter than stock flywheel has less rotating mass so the engine can accellerate quicker from low RPM to high RPM, but when you let off the throttle it will also decelerate quicker, which means getting back into the powerband can take longer. Opinions vary, but in general you will see drag racers using lighter flywheels where every tenth of a second counts in quick accelleration, and woods racers using stock flywheels (or even adding flywheel weights in many dirtbike applications) to maintain RPM and minimize clutching, thereby reducing rider fatigue. Here's a pic of Sredish's lightened flywheel, you can see where material has been removed from the perimeter of the flywheel but the tabs were not touched: Q#9:What the hell is a "woodruff key"? A#9:A woodruff key is a shaft key that's shaped like a half-circle when viewed from the side. It is made to fit into a half-circle slot machined into a shaft, in this application the tapered end of the crankshaft. The inside of the flywheel has a rectangular slot or "keyway" that fits over the woodruff key as it sits in the crankshaft's slot. Here's a pic of Meat's woodruff key, and the crankshaft keyway without the woodruff key installed:
-
Even if you buy the bearings and washers, you would still have to send your crank out to get them installed. The crank is pressed together. It takes more than a shop press to take it apart and put it back together. Again, as already stated, call HerrJuggs, Fast, or a site sponsor of your choice and send the crank to them for inspection and repair. Unless there is major damage to the crank it is relatively inexpensive. Rick
-
Takes 2
-
Ditto! As honest as they come. You can shoot dice with Eric over the phone...
-
Got the tank today. Thanks! Rick
-
64mm bore x 54mm stroke they are all the same since the beginning...
-
Read >HERE< , first paragraph explains how to measure clearance. You'll need one of >THESE< and some of >THESE<.
-
Might try some copper washers like on a cool head and some sealant on the threads...?
-
Does it carry the front wheels any when you launch?
-
Alky cubs like a little more timing, mine is 8* btdc with stock ignition. Start with your PJs all the way open and work down from there. Read >THIS<, scroll to post #34. Rick
-
How to calculate compression ratio?
tedd1 replied to robert0762's topic in General Banshee Discussion
Lay a straight edge across your cylinder, front to back. Roll the crank till piston contacts straight edge. Use the bottom of your dial calipers to measure the distance between the edge of the piston and the top of the cylinder. Measure on the side above the wrist pin. This measurement will be a negative number when you enter it into the formula. The amount the piston rises above the cylinder make the dome volume smaller... -
Need videos for the new BansheeHQ.com home page
tedd1 replied to locogato11283's topic in General Banshee Discussion
Have a look at >THIS<...you can do anything you want with it, or nothing, won't bother me... -
I use the Primary Drive combos on 4 different bikes with very good results. One of them is an alky cub...
-
It may already be posted here and I missed it, but there may soon be another option...>HERE< Rick
-
Call/PM Kevin and ask him these questions. He will set you up!
-
Clutch basket cushions?
-
I believe THIS is what he has...
-
Know who made the stem? What is length & width? Thanks, Rick
-
This is what I use...
-
Check >HERE< for the basic info on testing the electrical system.
-
I would guess that 17cc domes would require 110 or better. Everyone says it takes double the amount of fuel. I think it is more than that. I only get about a dozen 300' passes on a factory tank. I drain the tank of any leftover alky and pour about a quart of premix gas in then run it till it dies. Starting shouldn't be an issue until the temps get down in the 40 degree F range. I spray the filters with a small shot of starting fluid. Some guys have a squirt bottle with gas that they put a few drops on the filters with. Your tank, lines, and carbs will be fine. just don't let it sit for long a time with meth in it. Your carbs will take some major prep to run alky. The dumps need to drilled out to 0.120" to 0.125" range and will have to have adjustable power jets installed. If you run only 300' drags you can get away with larger bowls but if you run any farther than that at WOT you will need a pump. I highly recommend you have the carbs converted by someone with experience or pick up a known good set already set up. I really like alky so far. It is easy to tune with the power jets and is very forgiving. It can be ran very rich with no power noticeable power loss. It can be a little messy sometimes, you will blow raw fuel out the pipes which makes a mess out of the silencer packing. And be careful about venting the shop, the exhaust will run you out quickly! Have fun! Rick
-
Yes, you will need blaster style domes for your cub.
-
Need to increase my cpmpression 4mm stroker
tedd1 replied to Kingsley78's topic in Banshee Repairs and Mods
If your pistons do not go above the deck then you are correct that you would not need stroker domes. And the domes in your link above should work. A stroker dome is cut 2mm to allow for piston clearance if it goes above the deck. If/when you get the proper domes, you may need the spacer... Rick -
Need to increase my cpmpression 4mm stroker
tedd1 replied to Kingsley78's topic in Banshee Repairs and Mods
I don't believe those domes are for a stroker... you can PM dlnoss, he is a member and a site sponsor (dlnoss)... I am also concerned about the spacer that was originally installed. With a spacer, you don't need stroker domes. If you then pull the spacer, your pistons will hit the head. These are stock cylinders? Is your crank long or short rod? I am beginning ti think that you may a mismatched pile of parts. Pull the head and park a piston at TDC and post a pic, please. Rick -
Need to increase my cpmpression 4mm stroker
tedd1 replied to Kingsley78's topic in Banshee Repairs and Mods
Make sure your domes are for Blaster pistons. The squish angle is different and could be part of your problem. Rick