uman1030
-
Posts
814 -
Joined
-
Last visited
-
Days Won
3
Content Type
Profiles
Forums
Events
Gallery
Store
Everything posted by uman1030
-
Best of craigslist..................
uman1030 replied to Blownyel93's topic in General Banshee Discussion
↑↑ now that was uncalled for! I'm going to have to pluck my eyeballs out with a spoon to get rid of the image that was burned into them now. Some things you just cant UNSEE -
24 like abe has for that engine
-
20cc domes on stock bore and stroke at sea level are rated at 169 psi, at 1000ft 157 with those figures that would be around 163 at 500ish asl. Again that's with stock piston and stroke. think that is just touching into just above pump gas especially with any + timing.
-
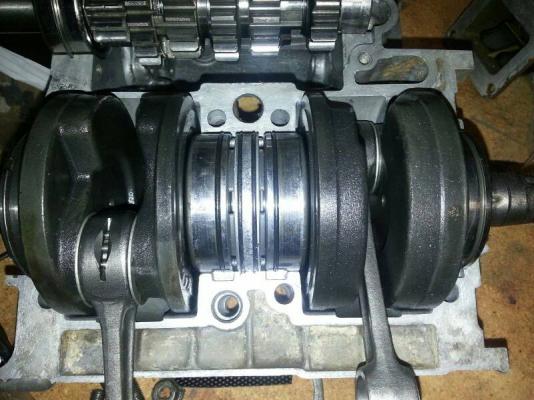
supposed to be a 10 mill crank of unknown brand thats all i do know.
-
Electrosport stator won't let bike rev up
uman1030 replied to Jasonc's topic in Banshee Repairs and Mods
you say you removed parking brake crap, did this include the switch in the clutch lever? if not, unplug switch. If so, try snipping the green/yellow wire off at the cdi. its for a rev limiter hooked to parking brake switch which if grounded makes the bike unable to go over idle rpm by limiting the spark/timing. -
↑ use the boot clamps to tighten intake onto pvc
-
Need help identifying this 10mm crank please.
-
Suggestions on rear skid plate + a few other Questions
uman1030 replied to lowidenfast's topic in Banshee Repairs and Mods
Ride height is adjusted by preload of the springs not the knobs. The knobs adjust the rate of compression dampening. Edit: you said you have Elkas? they have serial numbers on them you can contact elka and see what type of application they are set up for, weight, type of a arms and length of swinger. They may not be set up for your weight or for different a arm or swinger components making then slightly less efficient for you. easily remedied by either adjusting preload or getting different springs -
Suggestions on rear skid plate + a few other Questions
uman1030 replied to lowidenfast's topic in Banshee Repairs and Mods
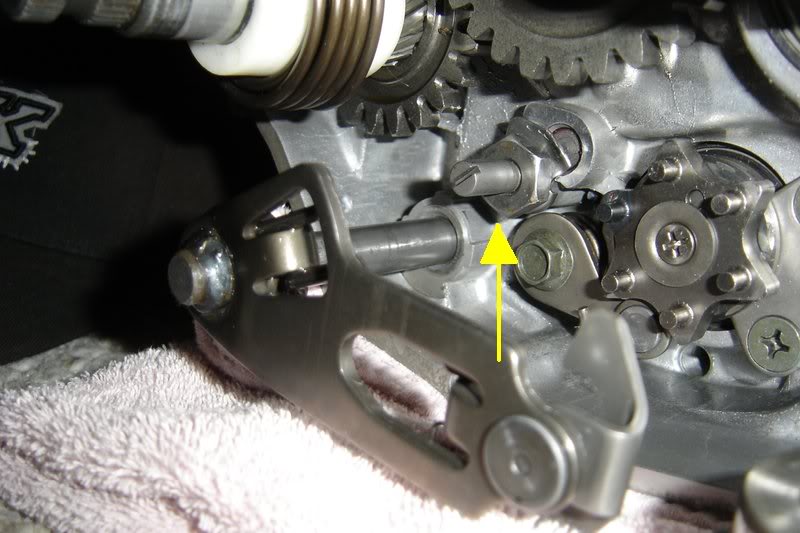
yes first adjust it back n the handlebars. that's what i meant but i guess after rereading it it wasnt very clear. To adjust the eccentric bolt you have to remove the clutch basket in order to get at it. now before you bend the lock down to adjust the bolt i would just inspect it first. this thread will explain how to adjust it correctly http://bansheehq.com/forums/index.php?showtopic=144807&p=1248863 here is a pic of the actual bolt for location reference
-
Suggestions on rear skid plate + a few other Questions
uman1030 replied to lowidenfast's topic in Banshee Repairs and Mods
Its really simple to adjust the clutch at the clutch basket. Drain the fluids,(oil and coolant) remove the foot peg and kick-starter remove clutch cover bolts then cover. Ive always been able to reuse my clutch cover gasket. While its apart i would check the adjustment of the eccentric bolt while your at it this can also cause shifting issues and make it hard to find neutral. Also its not uncommon for the bike to surge forward slightly when you pop it in gear or when you rev it. When ever an aftermarket clutch is installed. OEM clutches have little rubber rings that help push the plates apart when clutch is engaged. These get old and worn out and get tossed so with out them the plates have a tendency to slightly stick together. To adjust it, make sure you move the adjustment on the lever back to allow slack in the cable. Then loosen the 10mm nut on the bolt of the adjuster located in the center of the clutch basket. Then adjust the bolt part of the adjuster in until it pushes the clutch actuator lever until the arrow on the case lines of with it. depending on clutch brand thickness can be slightly different and change adjustment slightly. But the arrow method is a good basic method. I adjust mine until its about an 1/8th of an inch of play before it actually makes contact inside. If you adjust it too tight then it will cause it to make constant contact on ball and rod and weld it together. you don't want to do this obviously. when you have it where you want it use a flat head screwdriver to hold the bolt in place and use a 10mm wrench to adjust the nut tight. if you dont tighten it enough it can come loose and loose adjustment and you'll have to open it back up to repeat the process. -
Reply 10 on the above thread link will tell ya what year the frame is. Its the 10th spot letter/number
-
Perty little bike there! like the color scheme on the frame and suspension!
-
Already tried that! Doesn't want to part it out
-
sounds like carbs are not synced properly and idle may be set higher on the side that smokes more at idle yet on the top of that carb its adjusted looser making it drag behind on throttle. With engine off press the throttle slightly and let off slowly, listen for a click made by the slides bottoming out. You should hear a single click from both carbs in unison if they aren't synced you will hear a double click when each carb hits the idle screw.
-
Couldn't remove pilots? Use a small flat head screwdriver. 27.5-30 pilots, around 300-320 maybe go fat due to cold 1 size every 20 deg drop for mains. If it has stock mains still running it like this will cause damage.
-
Fat on main, lean on pilot.
-
second that, sound like she may be low on compression. Check this out if its not the issue possibly try turning a/f screws in to 1 turn out each. 30 pilots are usually as fat as you need to go in my experience.
-
Ok let me know!
-
calm down, someone already taught you how to put your 4mill in neutral. i was just cracking a joke.
-
up, up, down, down, left, right, left, right, b, a, start.
-
So what are the advantages/ diffrences of the Tech 3's VS. the CF1's Can get CF1's for $895 with GBC XC tires mounted in a combo set http://www.ebay.com/itm/Hiper-CF1-Beadlock-Wheels-GBC-XC-Master-Tires-Front-Rear-Kit-Yamaha-Banshee-350-/380777000164?pt=Motors_ATV_Parts_Accessories&hash=item58a813ece4&vxp=mtr they list Hiper tech 3 for $1095 for a similar combo set. same tires. http://www.ebay.com/itm/Hiper-Tech-3-Beadlock-Wheels-GBC-XC-Master-Tires-Front-Rear-Kit-Raptor-700-660-/380770877921?pt=Motors_ATV_Parts_Accessories&hash=item58a7b681e1&vxp=mtr Also have a set with ambush tires same price $1095 http://www.ebay.com/itm/Hiper-Tech-3-Beadlock-Wheels-CTS-Ambush-Tires-Front-Rear-XC-Kit-YFZ450R-YFZ450-/400580100861?pt=Motors_ATV_Parts_Accessories&hash=item5d446f42fd&vxp=mtr Any thoughts or suggestions welcome been looking for used but probably just nut up and buy a nice set.
-
TTT
-
If they felt it was necessary and had money in hand and that was the only thing holding back the sale, i would gladly perform the necessary tests in front of them but i wouldn't just let anyone start wrenching on my shit for damn sure. I would be almost impressed if they knew what a leakdown test was in the first place. Every one Ive ever bought or sold shit to really seemed like they had no clue about much except where to put gas in it sadly.
-
Also the fact that you need 280s with a stock airbox makes me suspicious that it may have an air leak. Check over your intake boots very carefully and look for cracks. make sure reed cages/ intake is tight. i would say its suspect.
-
Identify your pilots and where the Air/fuel screws are set at. Turn the A/f screws in clockwise counting the revolutions until lightly seated, make note of what they were at then back them out 1.5 turns making sure they are both the same.