


NN2
-
Posts
180 -
Joined
-
Last visited
Content Type
Profiles
Forums
Events
Gallery
Store
Everything posted by NN2
-
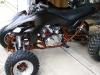
Took a couple quick pictures with the phone since the wife took the camera on vacation (my vacation now ) Just threw some of the front suspension on. Still have to tighten it up and polish the shocks before putting them on.
-
Just as the title says. The compression test when kicking over is a given but I see some also recommending a compression ratio. Is this a calculated #?
-
PM's replied to. TTT
-
The orange looks much better when outside and in the sun. Doesn't look so orangy. As for the pipes, I plan on modifying my pro circuits to fit because I'm just not going to have the time to make my own right now before riding season. I'm getting anxious though. Still shooting for around the 1st week of April to fire it up.
-
Clutch Cover has SOLD!
-
I am located in Utica, MI. My paypal address is [email protected]. I am registered on Ebay as nationscreations00 with over 150 100% feedback. Prices are with shipping included. 21cc Pro Design Domes- $35 (I bought these from another member on here but never used them. Great condition) Stock head- $25 (I took this off when I bought my banshee. I believe it was rechambered for the first rebuild. I think it may also have had the domes cut since I can see milling cuts inside the dome area. RB Racing in Lansing, MI did the machine work) Single 35mm Keihin Carb w/ filter, cable, and outerwear- $135 (This is from my Trinity single carb setup but I sold the intake. All cleaned up inside and out. Has a 45 pilot and I believe a 285 main jet) Pro Design Billet Impellar- $65 (Comes just as seen. Not much to say about this) DID X-Ring Chain- $40 (Just bought this last year when I rebuilt everything. It has no more than 20 hrs of run time on a stock stroke but ported bike. Nothing insane to stretch it out. It was for a stock swingarm, I think 102 links. Oiled with chain wax religiously) Stock clutch cover- $30 (Powder coated black chrome with a clear coat. Doesn't have a water pump, seals, etc. Comes as pictured with stainless screws. Detailed enough post? I think so. Wish they were all like this.
-
I thought I'd just start adding the motor pics and mods to this forum and leave all the powder coating appearance stuff for that forum. A couple pictures from when I was putting the new 4mil crank in. I put a max load bearing on the clutch side for a little extra insurance, I hope. Some F.A.S.T. goodies! Was able to get the basket on. The fibers were soaking in oil. Didn't feel like getting the woodstove going to keep my hands from going numb so this is it till the weekend.
-
F.A.S.T (Jeff is the contact and a site sponsor), Passion Racing (Jim is the contact), Herr Jugs Racing (Kevin is the contact), and a bunch of others but those are usually near the top of the list. Most everyone that is well known offer good port jobs.
-
The colors called Translucent Burnt Candy Orange. It definitely turns toward a goldish color when the light hits it directly. I added a little bit of flake in the clear top coat. There's a little more than I would have liked but that is because I put such a thick coat of clear on it. When I do the frame I'm going to tone it down more like the rest of my small parts I already did. Little bit of a learning curve yet. When the lights not hitting it the color looks like a deep dark orange.
-
I have been posting progress of my YFRZ Shee build in the engine building but figured since most so far has been appearance, here would be more appropriate until the motor is being built. Here's just a couple pictures of my cases I did last weekend. Doing these translucent colors is much more tricky than the other solid colors. You can really tell if you don't get even coverage with the powder. They look a lot better in the sunlight
-
If someone has one for a decent price and functional I'd like to get one. PM me if so.
-
Thanks a lot! Hammer and chisel, no problem :biggrin: I didn't watch the video because I didn't feel like registering to be a member but the description made plenty of sense to me. Very similar to indicating parts when turning. I never realized that a crank was that easy to change run out on.
-
I want to know how a crank is aligned and trued. Not that I am going to do it myself but like to know how things are done. If it's out of alignment, what does a builder do to the crank? Just curious.
-
http://www.heritagemakers.com/?event=proje...tSponsor=322608 here
-
She has done one hell of a nice job! Very creative. Also very surprised to see mine on there and can't wait to be able to get one.
-
I powder coated mine last year. Looked just fine all season and still cleaned up good.
-
SOLD...
-
No longer have the banshee so passing these on. I know they sure saved my ass in the dunes a couple times.
-
What tires? lightest best hook for gravel road
NN2 replied to ryansedy's topic in Banshee Repairs and Mods
I have some Klaws and I have been very happy with them. I think the only improvement would be Razrs. -
Finally made a little more progress this weekend. The swingarm and subframe are pretty much done. I am thinking about having something laser cut to put in the open space between the bars on the swingarm. Cylinders are finally out for porting and I got my cases washed and ready for powder coat. The swingarm has a honda carrier and I'm going to use the rear brake from one also so it is a dual piston. Battery box cut out on this one
-
With that said, no. I bought it last year and was told it was a hot rods crank he had put in. Everything else I was told that was done has checked out so far...the porting, clutch, shift pro, milled head. If you have a way for me to confirm it is what it is or isn't, please let me know. I don't want to give false info. I know some hots rods cranks have some color but have seen others that don't. Not sure how to tell. Thanks
-
Just took this out the other night to replace with a 4 mil for my project. It was run for less than 2 seasons. Only 50-60 hours for me. Perfectly good and a lot cheaper than new. The wrist pin bearings go with it. $225 shipped. I am located in Utica, MI.
-
Here's a couple pictures. Some of the powder coating I did last weekend. Like most pictures of PC'ed jobs, they don't show how good it really looks. Then what I have done so far with the sub frame. I need to add 3" to it, make some weld in adapters to mount to chassis, and add to the seat mounts. So far it is just tacked in place except for the flag mount.
-
Yes. For the price and what you can do, can't really go wrong.
-
The way it's going right now I might just have to cut up my procircuits to fit temporarily. Hell, they might even look ok. I just don't see me having the time to make pipes.