


muggzy
-
Posts
498 -
Joined
-
Last visited
-
Days Won
2
Content Type
Profiles
Forums
Events
Gallery
Store
Everything posted by muggzy
-
Did you remove the TORS Control unit (the little black box screwed to the frame above the left carb)?
-
Hey I'm looking for a stock rear brake caliper; doesn't need to have any meat on the pads or still have the parking break, just needs to be in decent shape. Let me know how much and if you can get to the P.O. to ship it tomorrow via Priority Box (should fit in the $10 box). Thanks George
-
Have you looked at the reeds? Don't know who's reeds they are but the reed cage may need the clearance, longer reeds will give you more edge length and therefore air flow. If the reed cages fit in the port without any obstructions then there's no reason for the spacers that I can think of.
-
Hey New Rochelle! What do you consider "upstate" I'm off exit 16 from the NYS Thruway and I've got a couple of decent places to ride pretty close by. Where do you ride?
-
Hey! I'm in Monroe/Woodbury NY. Where do you Ride? I've got two decent places down here.
-
Hey All, The prior owner of my Banshee brilliantly welded on the left foot peg and I was finally forced to repair it so I can change my sprocket (couldn't get the shift pedal off unless I removed the engine from the frame otherwise). Long-story-short, I got the pedal off and ground the weld back down to the original metal. The front threaded part that's factory welded to the frame was loose and fell off as soon as the weld around the back was cut (maybe why he welded the peg to the frame), it's no more than a thick washer with the hole threaded. There is an oversized hole in the 1/16th in. thick metal under this. The hole is just the right size that I can pound a lug nut with the flange facing outwards in to proper depth to match the old washer and weld it in place. I'll end up with more than the factory thread when I'm done with this hole. The rear hole threads are in no shape to re-use but I was able to reshape the metal around this pretty close to it's original shape. The big question is this: Can I use a thread repair kit (like Helicoil or Time-sert) to repair this thread? The metal's about 3/16" thick here. I've never used a thread repair kit for this kind of application before and I'm a little concerned about the torsional force from standing on the peg and the relatively shallow depth of the material for the insert to bite into.
-
Looking For Detailed Step By Step TORS Removal Instructions
muggzy replied to tmecars's topic in Banshee Repairs and Mods
Glad to help - Any Time -
Looking For Detailed Step By Step TORS Removal Instructions
muggzy replied to tmecars's topic in Banshee Repairs and Mods
-
Looking For Detailed Step By Step TORS Removal Instructions
muggzy replied to tmecars's topic in Banshee Repairs and Mods
Hey tmecars, Get a Clymers manual for yourself. Pics and step by step are great. Can follow the instructions in there to remove the TORS box and the TORS switches that sit on the carbs. If you're leaving the TORS switches on the carbs, you can adjust he idle via the throttle cable up on the handle bars. Cap off the wires as described in the link above in this thread. It sounds like you just bought yourself a TORS elim Kit and are worried about installing the Idle adjustment screws that come with it? the Clymers manual won't tell you how to do this. You'll have to disassemble the carbs completely - follow the Clymer's manual. There's a "post" located on the outside of each carb that looks like a screw should go in it but there aren't any threads. This is where you'll drill with the bit that came with the TORS Elim kit. Look down the top of the carb (where the TORS switches used to be) confirm that the post you're going to drill aligns with the center of the round-slide hole you're looking down). The post has a "pilot hole" of sorts, spray it with WD40 to lube the drill bit while drilling and use it liberally for tapping as well (you really should use a drill press for this but I've seen someone on here said they did it with a hand drill. If you've never done this, find a friend you trust or a machine shop to help you. CAREFULLY cut the burr from the inside of each round-slide hole with a good sharp pocket knife feel with your finger to make sure you got all of the burr but don't scrape the smooth sides of the round-slide hole. Clean the carbs really well and reassemble the carbs as instructed in the Clymer's manual and install the new idle screws that came with the kit leaving them well back so they don't interfere with the slides yet. Put the carbs back on the engine but leave the air box boots off. Install your new carb tops onto the carbs (with slides and new throttle cable). Adjust the cables at the carb tops so the slides JUST bottom out exactly equally by looking down the throats of the carbs and working the throttle. Adjust for free play at the handlebars (Clymer's). Check that the slides are synchronized (Clymer's) with the throttle WIDE OPEN using the windows on the carbs - they should be fine. Again looking down the throat of the carbs, turn an idle screw until you just see the slider move. repeat for the other side then turn each idle screw in 1 turn and tighten the lock nuts finger tight. MAKE SURE the rubber boots on the throttle cables at the tops of the carbs are pulled down over the adjuster screws so you don't get air leaks. Put your filter box and filter back on and start your engine up - you may need to keep very slight pressure on the throttle to keep it idling. When it warms up, adjust the new idle screws in equal increments until the engine idles smooth and tighten the lock nuts down. You're done. This may sound like a lot but I just did mine and it's not bad, just work slowly and carefully and you'll be fine. If you need, I can take some finished pics tomorrow evening for you. Good luck, George -
I was riding this weekend and ran through some mud puddles. Ok, A LOT of mud puddles. The top of my air box is drilled out and I have a K&N drop-in air filter. Apparently I was splashing water (somehow) over the top of my air box and it was choking out my filter. The engine ran but I lost all power until the filter dried out. Has anyone got a fix for this that'll keep my airflow high. Does anyone make a wider-than-stock snorkel to replace the skinny stock snorkel? My only other option is to put a new lid on my air box. My mods are in my signature below...
-
You guys that are suggesting an aluminum sprocket are failing to realize that there's a WHOLE LOT of abrasives in the mud and grime and trail dust that you'll never touch on a drag strip. The relatively soft aluminum will wear right down under those conditions. I'm not at all concerned about weight so I'm definitely gonna use steal. The harder the better. As for the chain, a higher tensile strength chain won't matter while it's new on a basically bolt on bike but when it wears, It'll still have the strength that the others have when they're new. Marshall Chain and Sunstar Steel sprocket in the rear with the hardened chromalloy Moose sprocket in the front.
-
Thanks for the replies. I'm going with a Marshall O-ring chain, a Sunstar steel 41T sprocket in the rear and the Moose 13T front. After I wash down my quad at the end of the day I'm currently wetting down the chain with WD-40. I think it should be safe for the O-rings and it displaces the water. Any other suggestions? I'm reluctant to use the sticky chain lubes - even when they say "o-ring safe" 'cause the stone dust I go through sometimes is the last thing I want sticking to my chain.
-
Any opinions on sprockets out there? I need to replace my chain and sprockets soon so I'd like some advice. I'm riding mostly woods (purely recreational) and have a 13 - 41 set-up. I'd like to keep it that way but my front sprocket is pretty worn and the chain could probably (definitely) be replaced. I'm looking at the 13T Moose chromoly steel but their rear 41T is aluminum. Not sure I like the idea of an aluminum sprocket. Any suggestions on a long lasting chain would be welcome also. I just bought a cheap chain for $29 but realize that's probably a big mistake.
-
Anyone have a sketch to mod the shift star? When it's running, my banshee is nearly impossible to get into neutral. Everything else is fine, shifts easily into other gears up/down no problems just nearly impossible to hit that neutral notch on the shift star. If anyone has had success with a purchased mod, I'd be happy to hear about it.
-
Hello ALL I got a bad TORS switch on my left carb. so my 'shee wont idle. I know most of you seem to recommend dumping the TORS bodies altogether but son rides my quad. I don't mind risking my own neck but my kid's is a different story. Has anybody had a bad experience with a stuck throttle after putting in a TORS elimination kit?
-
Thanks Savage420 that's reassuring. Now that I've got everything all put back together - If I could only get a spark...
-
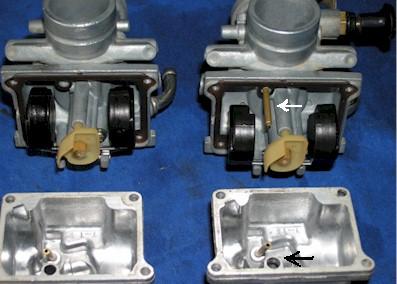
Hello ALL, I'm rebuilding a '97 Banshee 350 that I inherited needing a LOT of work. We've just disassembled the carbs to clean them up since they haven't been used in 3-4 years. While reassembling them, I noticed that the left carb (on the right in the attached pic), the one with the choke has a brass pick-up tube (white arrow) that the right carb (left in pic) is missing. There is a hole that this tube goes into on both carb bodies and there is a larger hole in the float bowl (blk arrow) that they would sit in when assembled. Thing is, when I looked for the part on the parts diagram in the Clymer book and in the on-line carb diagrams (http://partsfinder.onlinemicrofiche.com/cheapcycleparts/Yamaha_OEM/YamahaATV.asp?Type=13&A=145&B=9), the tube doesn't show up at all. What's the deal? does this part only exist on the choke (left side) carb or is it missing from my right side carb. If it's missing, do I have to make one out of brass tubing since it doesn't show in the parts lists? Oh yeah, the carbs are Mikuni round slide VM26SS.
-
Hello Gang, I've just finished rebuilding the lower end and have put the pistons and cylinders back on my '97 Banshee. The thing originally shredded a pushrod bearing on the crank and gouged the cylinders pretty bad so they've been bored out to 65. There is a Pro Design Cool Head with 22 cm domes going back on the head. While I'm waiting for the gasket set for the Cool Head, I want to rebuild the stock carbs - this project has taken over a year (maybe two) and I'm concerned about them sitting that long. 1) Can anyone recommend where I should get a rebuild kit for the carbs or should I just buy parts? Part suggestions are welcome. 2) I live on the east coast only 900' above sea level, any suggestions for jet size on the carbs? 3) what octane and fuel-oil mix should I use? Thanks All
-
Looks like lt1bird had the right idea, I switched the two tranni forks that are the "same" and the shifting was NOTICEABLY better. Still a little sticky at spots but we got all the way up and down all six gears several times. There was some VERY tiny flat spots on the fork,"buttons" that slide in the shift drum groves also, I don't think that they're the problem but I'm just gonna replace all three along with the shift shaft and springs anyway. Thank you all of your help! George
-
Thanks to all of you. I'm looking forward to getting into the garage this weekend to try your ideas, I'll let you know what happens. In the meantime, if anyone has anymore, keep 'em coming. The tranni worked fine before I ripped the case down, so I'm assuming that it's something I did. probably subtle (like swapping the two similar forks maybe they've broken in differently) but maybe not. I'll look for heat and wear damage too - considering that the the piston rod needle bearings went on the crank and ultimately destroyed the pistons, maybe there was some associated damage? Before that, shifting was fine except getting it into neutral was a little finicky All of what I've described is on the bench with the case open or top half held together with 3-4 screws as described in the Clymer manual I'm using as my guide. There is a little play in the long part of the shift shaft that goes through the case (I'm planning on replacing it and the seal) and on the the pivot point where the double hook that grabs the shift star is connected. But since I can shift through a few gears and then the shift star locks up, I started questioning everything - including the minor binding of the tranni forks. I just don't have the experience to know what's normal and what's not. Loboboy, said what i suspected (won't shift smooth while open) but I think I should still be able to get through all six gears, like jharader say, shouldn't I? Thanks Again, George
-
I'm a total novice rebuilding a Banshee that burned up a piston and really need some help. Just finished installing the Hot Rods crank and reassembling the tranni. I'm going through the "transmission shifting check and adjustment". Shifting started to seem OK into 1st, 2nd, 3rd, and maybe 4th but then it "hangs" and wont go up or down. When I tried adjusting the "shift lever adjust bolt" (cam screw) to center the shift shaft hook around two pins on the shift star, there was some play in the shift shaft. Even though centering the hook wasn't perfect, I don't think that's the problem. I opened the case and rechecked the operation of the shift drum and forks without the tranni main and countershafts in place. Even though the parts look good, they do bind some. When I hold the forks up a little, the binding goes away. With the two shafts in place, they need to be turning to get through the gears and can be difficult to get into some gears (gotta play with the gears a little and it looks like the mesh needs to line up) but the shafts turn smoothly. I'm not sure what's normal and what's not. Any advice would be a huge help. Thanks! George