11AGUY
-
Posts
109 -
Joined
-
Last visited
Content Type
Profiles
Forums
Events
Gallery
Store
Everything posted by 11AGUY
-
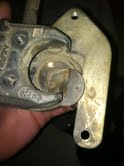
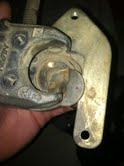
I didn't touch the brake with it off... the cap I am talking about is the metal cover/cap at the end if the piston (actually thought the whole thing was one piece)

-
ok, just got my new brake pads in and thought this would be the easiest part of the winter rebuild but unfortunately Murphy's Law had to intervene.. I can't push the piston back... I hit the brake and the brake closes, but I can't push the thing back... also, the little round dust cap that makes contact with the back of the inner brake pad fell off into the ground... looks like it is siliconed or glued in place... do i have to take the entire caliper apart and clean, lube and rebuild or is there an easier fix??? all help appreciated
-
put the tires on and it seems to spin a little better... tight, but spins... maybe just needed some rotations.... love the axle though, can't beat the price and warranty... seems to be excellent quality also, the spacer in the carrier is suppose to be loose.... the Clymer's manual talks about how your can manipulate the spacer so that you can drive the opposing side bearing out of the carrier.... another thought, if the bearings aren't seated properly the oil seal will extend out of the carrier and will not be flush with the lip or maybe it has to do with it being 19 freaking degrees in CT right now and the grease has the consistency of peanut butter!!!
-
have the same problem.... just installed the axle and it as tight as hell with only tightening locking nut by hand.... I drove the bearings in by hand with a piece of wood and a 4lb hammer so not to harm the bearings until they were properly seated... installed all balls bearing and seals... the seals were flush with the outside of the carrier bearing housing just like when i removed the damn thing... the spacer in the middle is loose, but it was loose when i took it off... I mean it spins but not very freely... help this sucks!!!
-
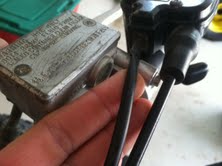
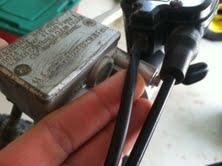
starwriter, this is the wire (the one I have my finger on), I can pull the whole thing out after i disconnect it??
-
just ordered one yesterday!!! will look much cleaner....
-
thanks for the help guys!!!!
-
i have searched for countless hours on this topic and have found many discussions on the net and this site but want to make sure I am doing this right... Once I get a thumbs up fro you guys I'll post pics of the process to do away with future posts. Parking Brake: 1. Took parking brake mechanism off rear brake caliper by unbolting (2) allen type head bolts 2. Took entire parking brake mechanism off clutch perch, disconnecting the cable that leads to the rear caliper and unplugged electrical connection on lever. 3. Followed the above stated electrical wire down the handlebars and unplugged it at the white plastic wire connection. Pulled out the unplugged electrical wire from the top of the handle bars 4. Attached Parking brake block off on rear caliper Question: Is that all I have to do for the parking brake??? TORS: 1. Removed TORS (Black Box) under left side of frame (under gas tank). 2. Unplugged the TORS Black Box from the wiring harness (threw out TORS BOX!!) 3. Unplugged the TORS connections from Both Carbs to the wiring harness. 4. Installed TORS elimination Kit. Question: Is there something I need to unplug on the throttle in order for everything to work perfectly.. After I removed the wires, I left the hard plastic white electrical connection caps hanging from the wiring harness because everything was unplugged...Also, is there a wire that needs to be disconnected at the thumb throttle assembly??? wiring diagram shows a TORS connection there or does the above stated connections make that wire/sensor null and void?? Think I am on the right track, but many posts say nothing about the thumb throttle assembly and the a few do saw there is wire.. All help is appreciated and when I have it right I'll post pics.. thx
-
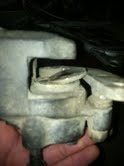
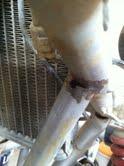
here is another shot of where its

-
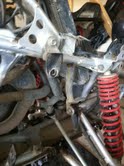
this is the frame
-
Guys is this hole suppose to be there.??? Next to radiator and exhaust. Same hole in the exact same shape on both sides.. Looks like it might be how it was welded at factory?? Not sure though..
-
question, I have the stock rear sprocket that is in decent shape, can you flip these around our are the designed for one side use.... the 41T is facing towards the left tire and has small u shape wear marks where the sprocket has made contact with the links....
-
thanks, thats what I'll do
-
searched and didn't find many topics... I hear that the o ring is suppose to be a more durable chain because the o rings help keep the lube in... the current chain that I have on now is the original o ring from 2003 and looms like the orings are splitting and cracking due to lack of lube... I am going to be doing trail riding in CT and some track when I have the chance.... does it matter what type i put on??? suggestions a
-
coo thanks for the replies guys... I am not going to race and will be doing trail riding in CT where the temps can reach down to below 10 degrees
-
interested to know how you make out.., just ordered the same axle yesterday, should be here in a few.... once you get it squared away plz post more pics or PM me.. thanks
-
anybody running this right now... here's the scoop... I have 2003 banshee that I will be putting a new top end on and new silencers.... everything else is stock... Live in CT at an altitude of 500 feet.. I have heard that you might have to rejet with this oil and is a high temp oil... the freaking guy at the yamaha shop recommended it and I'm not so sure anymore... I spoke to Maxima and they stated that Super M is there recommendation for trail riding... any thoughts and experiences appreciated Thanks
-
yeah i took off and cleaned one carb at a time and then put them back... choke tube is as straight as an arrow
-
Just checked one of the cylinders with the throttle wide open and it is still 60ish... Now from what the manual stated with every kick the pressure is suppose to rise until it peaks and if it sticks then rises its a problem with the valves... Mine is doing that as well...
-
Yes there is and it is attAched
-
lastly, when I pulled the plugs they were really wet.... I have #200 jet and I believe #25 pilot... 500 feet above sea level
-
ok just pushed it down by hand and felt some resistance, I wish i would have known about the throttle thing yesterday... does anyone know how many turn the air screw on the side of the carb is suppose to be turned out?? I think it was 2 turns out... is that 2 360 degree turns??? so if I do wind up having above 100 psi in each cylinder it's a carb issue??? bike just sounded really muffled and powerless... dirty pilot jets???
-
i'll do that and check the readings again.... I haven't rode in like 15 years, but when I was trying to kick it over I felt no resistance what so ever, felt like 0 compression and i actually couldn't believe the thing started.... I have already doubled what I initially thought it was going to cost to get her up to par... shouldn't complain, I got it for free.... my wife's cousin just rode it and never did anything to it.....
-
Yeah after I cleaned my carbs the 1st time and then had the float hang on me, I pulled the leaky carb and saw that it was all gummed up at the main jet... Guy at the machine shop said with compression that low I might need to bore... He said once I gave him the top end he'd know right away...gonna do everything new including the reeds and upgrade the main and pilot... Is the clymers manual any good??? Detailed more than the service manual... I have been getting a lot of good stuff on you tube and a few banshee sites
-
yeah I was shocked to see those #'s... especially when the number's should be in the 120ish range... did it three times on each cylinder and got the same readings.... I literally purchased the compression tester this afternoon from autozone... gonna grab my buddies tomorrow and see if I get the same readings... ordered a new set of reeds... I think their completely shot and are causing some problems... regardless, the engine has never been overhauled so it's probably time....