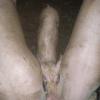
SAVAGE420 Posted September 26, 2010 Report Posted September 26, 2010 Note the filled-in hole on the left side of the carburetor, next to the fuel inlet. It is NOT drilled OR tapped. Yet. It soon will be. DO NOT mistakenly drill out the similar hole on the opposite side of the carburetor. It is factory-threaded, but the idle screw won't work if put in on this side of the carb. Using a grinding burr (shown here) or a hand file, you'll need to remove the taper from the lip of the un-tapped hole on the carburetor. This is done to ensure that the lock nut for the idle screw has a flat surface on which to seat. Here's the intended result. One clean and very flat flange. Work slowly, and be careful if you're using an air tool. The grinding burr will cut aggressively, and it is easy to take off too much aluminum. Also, DO NOT use a mounted stone when grinding aluminum. The aluminum will load up on the stone and may cause it to fly apart. Once you have the flange ground down, it is time to use the drill bit supplied with the idle screw kit (drill bit (#6) . Shove a rag down the venturi of the carburetor to help keep metal shavings out. Using a drill press (or a very steady hand) drill all the way through the hole, until the drill bit emerges into the throat of the carburetor. Again, work slowly and patiently. A vise really helps here too. Now that you have a neat hole in the side of your carburetor, it is time to thread it. Using the thread tap (6mm x .75mm) supplied in the idle kit (and some lubricant), thread the tap into the hole and spin it in a half turn and out a half turn in another half then out and so on until she is through. Make sure to cut new threads all the way into the throat of the carburetor. It is a good idea to check for burrs after you get done, especially inside the carb. You don't want the throttle slide getting stuck on a rough edge and you going full throttle uncontrollably into a tree while your friends point and laugh at you right??? Ah,no you dont!!! Almost done, Just blow out any aluminum shavings, thread the idle screw into the fresh hole. You're done with the hardest part. Here's the end result. The idle speed will have to be set once you get the carburetor back on the quad and the engine warmed up. Turn the screw to the proper setting and jam it in place with the lock nut. Just make sure to get ALL pieces of aluminum out of the carburetor before re-installing it. You don't want any metal shavings getting into the crankcase. Now go tear shit up!!! 1 Quote
muggzy Posted September 26, 2010 Report Posted September 26, 2010 Nice How-to Savage! This definitely ought to get stickied Quote
SAVAGE420 Posted September 26, 2010 Author Report Posted September 26, 2010 I already pinned it to the top after i posted it. Bunch more to come soon. Everything from a complete tear down to bare cases to a running motor, lil tricks and easy free mods and what not. I always take a ton of pics just for that. 2 Quote
2001blackshee Posted September 27, 2010 Report Posted September 27, 2010 I already pinned it to the top after i posted it. Bunch more to come soon. Everything from a complete tear down to bare cases to a running motor, lil tricks and easy free mods and what not. I always take a ton of pics just for that. Ok i must be an idiot// but only dumbs question is the one you dont ask... But what are the benefits of doing this? Idle adusjment on the fly? Im new to the shee world , im trying to soak up everything!! thanx Quote
SAVAGE420 Posted September 27, 2010 Author Report Posted September 27, 2010 You need to install them because with the stock set up the idle adjusters are on top of the T.O.R.S. boxes and when you do away with the T.O.R.S the idle adjustments go with them. So you need to do the install above to get idle adjustments back. Quote
BRUSKI Posted November 9, 2010 Report Posted November 9, 2010 I just completed this mod today. I am having trouble getting bike to hold idle though. Screws are in and even on both sides, cable is set, carb slides are in sync. I have not been able to set idle even after setting both screws all the way in. Is it because I have not tried to set them with an air filter on yet? Waiting on Toomey 2 into 1 Air intake to arive from RockyMountain Quote
tedd1 Posted November 9, 2010 Report Posted November 9, 2010 BRUSKI, Check that your screws are going in far enough to hold the slides up. You may have to grind a little more here ^ ... Quote
BRUSKI Posted November 12, 2010 Report Posted November 12, 2010 how far should the idle screw protrude into the stock carb? I had a local machine shop do the work on their press to avoid fubarring my carbs. He used a flat face drill bit and only went as far as the top of the slant on the shaft getting drilled and tapped. Also what would happen if the bowls on the carbs got switched? I had both carbs apart and this may have happened. I have noticed that the left stock carb has a gold colored metal tube protruding into the bowl by the pilot jet and the right side carb does not have that tube. I have pictures but my phone will not allow me to put them on my computer.. Could the switched bowls be reason for my shee dying when i let of the throttle quickly. I can hold throttle where i want idle set and adjust screws accordingly, and rev and let off throttle and it will die everytime. also.. i just added toomey 2 into 1 High Flow Air System with a Uni Filter.. Jetting is stock 200 Mains, stock pilots on stock Mikuni carbs, with stock exhaust.. for time being, want PCs for next mod, and everything else on bike is stock. Could it be the jets causing problem? I am at 1000 ft elevation 1 Quote
BRUSKI Posted November 12, 2010 Report Posted November 12, 2010 Found my problem... I had not unplugged the tors wiring and black box. When bike would go to idle it would die.. after unplugging black box and removing the switch in throttle lever box I was able to start normally and let idle.. rev hard and drop throttle and it would hit idle and run strong. So dont forget to unplug the T.O.R.S. black box under front left of fuel tank with black and yellow wiring. Next project... Parking break elimination Quote
TheBigShabowski Posted February 9, 2011 Report Posted February 9, 2011 This is exactly what i needed to do the mod. Quote
malcman Posted April 2, 2011 Report Posted April 2, 2011 Don't know if this is the right spot but just wondering if anyone knows where to buy just the needles with screws? I have a set of carbs right now and the needles in them at damaged from the PO, I'd like to put new needles in them. Anyone have any advice, all the searches I do come back with a complete kit. Thanks, Andrew Quote
FullThrottle_06' Posted April 8, 2011 Report Posted April 8, 2011 Where can this kit be purchased? I read carefully at the beginning of the thread to see if I missed it. The only info I saw was that the idle screws and the drill bit are a "kit" Quote
FullThrottle_06' Posted April 8, 2011 Report Posted April 8, 2011 Where can this kit be purchased? I read carefully at the beginning of the thread to see if I missed it. The only info I saw was that the idle screws and the drill bit are a "kit" WOW......ok. Nvr mind. After more research I answered my own question, dumb ass . F.A.S.T. has a TON of parts that I was un-aware that hey carried. Most of which I've learned and listened about from folks on this website. Thxs guys Quote
l3thal shee Posted October 13, 2011 Report Posted October 13, 2011 OK so what exactly does this do provide another air/mixture screw kinda? what what the hell would you do this for>? Quote


Recommended Posts
Join the conversation
You can post now and register later. If you have an account, sign in now to post with your account.