lowidenfast Posted March 3, 2014 Report Posted March 3, 2014 I just purchased a banshee that was set up for riding in the sand so it doesn't have a rear skid plate to protect the brake rotor and sprocket/chain. What skid plate do you suggest? I have an axcaliber + 4" axle and axle nut but still on the stick swing arm so will that affect the fit in any way? Look forward to suggestions as I need to get one in a hurry Another thing, it has the airbox eliminated with a 2 into filter where there is a "Y" shaped boot running from the back of the carbs into a single filter element. The element has the outerwear on it. How worried should I be about water/mud splashing on it? Are they pretty resistand to water with the outerwears on them? I plan to stay out of the mud and water as much as possible but it will be impossible to avoid it completely. Are there any airboxes that will fit this set-up? Last but certainly most concerning to me... The previous owner installed a new Toomey racing clutch that is said to have less than 10 hrs on it. When I shift into 1st, the bike tries to pull forward. It is nearly impossible to get into neutral with it running and I have even hit neutral between different gears (not just b/t 1st and 2nd). How is that even possible? I have never hit neutral on anything by accident unless it was on a 1st to 2nd shift. I tried to adjust the clutch on the lever but there is no more adjustment left. I have done some research on the web (including this forum) and it seems you have to drain the gear oil and pull the side cover off to adjust the clutch. I guess that's what I am going to have to do.... Any advice before I do? I printed the relevant pages from the user manual. Will I have to replace any gaskets or anything when I do? I'm a much better rider than I am mechanic and this is the nicest machine i've ever owned so I just want to be sure I know what I am getting into before I start taking this thing apart. Thanks in advance. Feel free to shame me and post a link if this has been answered before. I wasn't having any luck with searching for old threads Quote
uman1030 Posted March 3, 2014 Report Posted March 3, 2014 Its really simple to adjust the clutch at the clutch basket. Drain the fluids,(oil and coolant) remove the foot peg and kick-starter remove clutch cover bolts then cover. Ive always been able to reuse my clutch cover gasket. While its apart i would check the adjustment of the eccentric bolt while your at it this can also cause shifting issues and make it hard to find neutral. Also its not uncommon for the bike to surge forward slightly when you pop it in gear or when you rev it. When ever an aftermarket clutch is installed. OEM clutches have little rubber rings that help push the plates apart when clutch is engaged. These get old and worn out and get tossed so with out them the plates have a tendency to slightly stick together. To adjust it, make sure you move the adjustment on the lever back to allow slack in the cable. Then loosen the 10mm nut on the bolt of the adjuster located in the center of the clutch basket. Then adjust the bolt part of the adjuster in until it pushes the clutch actuator lever until the arrow on the case lines of with it. depending on clutch brand thickness can be slightly different and change adjustment slightly. But the arrow method is a good basic method. I adjust mine until its about an 1/8th of an inch of play before it actually makes contact inside. If you adjust it too tight then it will cause it to make constant contact on ball and rod and weld it together. you don't want to do this obviously. when you have it where you want it use a flat head screwdriver to hold the bolt in place and use a 10mm wrench to adjust the nut tight. if you dont tighten it enough it can come loose and loose adjustment and you'll have to open it back up to repeat the process. Quote
lowidenfast Posted March 3, 2014 Author Report Posted March 3, 2014 Thanks Uman1030. How do you adjust/check the adjustment of the eccentric bolt? I guess I should turn the adjustment on the handlebars almost all the way in and then adjust the clutch from there so I have easy adjustment down the road, right? Quote
uman1030 Posted March 3, 2014 Report Posted March 3, 2014 Thanks Uman1030. How do you adjust/check the adjustment of the eccentric bolt? I guess I should turn the adjustment on the handlebars almost all the way in and then adjust the clutch from there so I have easy adjustment down the road, right? yes first adjust it back n the handlebars. that's what i meant but i guess after rereading it it wasnt very clear. To adjust the eccentric bolt you have to remove the clutch basket in order to get at it. now before you bend the lock down to adjust the bolt i would just inspect it first. this thread will explain how to adjust it correctly http://bansheehq.com/forums/index.php?showtopic=144807&p=1248863 here is a pic of the actual bolt for location reference Quote
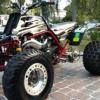
WINDYCITYJOHN400 Posted March 3, 2014 Report Posted March 3, 2014 And forget about running an air box. Your fine with what you have. Even better….get individual pod filters with Outerwear's. But your fine for now. Nice bike by the way. Much nicer than the "Average" machines around. The front suspension is really a great improvement. Quote
lowidenfast Posted March 3, 2014 Author Report Posted March 3, 2014 Thanks Windycityjohn - I used to race a banshee years when I was still in high school with stock suspension. THIS one is what I needed back then! The rear suspension is Elka stage 3 as well. They do sag quite a bit front and rear which I need to figure out before I do any big jumping because the reservior knobs are set on the "hardest" setting. I've had one quad since my last banshee, a nice '89 250R, for a short time. It had upgraded suspension as well (not as nice as this one) and the handling was amazing in the trails but there is no substitute for Banshee power. I am very pleased with this bike, just have to work out this clutch issue and get something to protect my rear sprocket/brake rotor before I take her for some serious trail riding in 2 weeks Quote
trickedcarbine Posted March 3, 2014 Report Posted March 3, 2014 I'm with Uman on the clutch adjustment, but you need to inspect the inner hub and basket for chatter marks and grooves. That would be another problem of the lurching. Pretty predictable since you said there is no more adjustment with the perch. As for the intake, it sounds like the toomey set up. Not a bad filter as long as you have an outerwear. Just don't think you're going snorkeling with the big 4X4's. The skid plate. I like the PRM I have but it is a bit bulky. The new stuff from JDS is pretty cool. It's little guards that go around the sprocket and rotor. Pretty trick. Quote
uman1030 Posted March 3, 2014 Report Posted March 3, 2014 Ride height is adjusted by preload of the springs not the knobs. The knobs adjust the rate of compression dampening. Edit: you said you have Elkas? they have serial numbers on them you can contact elka and see what type of application they are set up for, weight, type of a arms and length of swinger. They may not be set up for your weight or for different a arm or swinger components making then slightly less efficient for you. easily remedied by either adjusting preload or getting different springs Quote
lowidenfast Posted March 4, 2014 Author Report Posted March 4, 2014 Thanks Uman, I will look into that. They feel great really but I haven't had much seat time to test them out yet and wonder how they will do for jumping with the way they are currently set up but I do see the larg nut that would adjust the pre-load now that I have taken a good look at them. Just got it on saturday and had my daughter all weekend so not much time to inspect things. She is 4 1/2 and just got a Honda TRX 90 for Christmas (throttle limitied, 1st gear only) so i spend my weekends cheasing her on foot lately. The banshee doesn't make a good trail bike to ride alongside a 4 year old... Quote
lowidenfast Posted March 4, 2014 Author Report Posted March 4, 2014 trickedcarbine - Just checked and those JDS guards are exactly what I wanted (saw them ona quad last year) but the brake guard doesn't fit stock swing arm/carrier. #*%^!~$ Quote
lowidenfast Posted March 4, 2014 Author Report Posted March 4, 2014 Well, I think (hope) the clutch just needs a simple adjustment. Not sure if you can tell from the pic but the "arrows' are nowhere near lined up. Thanks for all the help guys. Wish me luck Quote
lowidenfast Posted March 5, 2014 Author Report Posted March 5, 2014 so I got the fluids drained, case removed and tried adjusting on the clutch but now I am stumped. The arrow on the actuator lever is too far to the left side of the bike. Nothing that i do to the to the adjuster bolt located in the center of the clutch basket will line the arrows up. I loosen the cable on the perch by turning it all the way in, i push the actuator arm forward as far as I can (per Yamaha's instructions) and then I adjust the bolt on the clutch until the arrows are aligned on both the actuator arm and the "protuberance", as Yamaha calls it, on the case are aligned. When I am doing this, the adjustment is pushing the actuator arm back towards the left side of the bike until they are aligned but only because I am applying pressure. When I let go of the actuator arm it swings "back" (towards the left foot peg) and the arrow on the arm is no loner aligned. I can start to re-align them when I take the slack back out of the cable by backing it out on the perch but I don't get anywhere near close enough before I am out of adjustment on the perch. It has a practically brand new Toomey racing clutch. I am thinking the cable is too long. It is not the stock cable (it's steel braided). I understand that the two arrows aligning are a general guideline and may not be spot on but I am not even getting close. I can run the bolt on the clutch so far in that i really don't have enough threads for the locking nut and i can run it so far out that the crankcase wouldn't even clear it and neither extreme solves the problem. The goal is to have the arrows aligned without me manipulating the actuator arm, right? Then I fill it back up with fluids and test it out, meaning I should still have plenty of room to fine tune things on the perch in case it needs to be loosened or tightened slightly to hit the sweet spot. Does this sound right or am i missing something altogether. Quote
uman1030 Posted March 5, 2014 Report Posted March 5, 2014 Can you take a pic of the clutch assembly. is your pressure plate mounted correctly arrows lined up and fully seated? Pretty sure i too had to fiddle with the cable adjuster to get it perfect but i think it was fairly close to lining up once i adjusted the one on the pressure plate. I do however remember it not wanting to adjust correctly at first but i think i had the pressure plate not fully seated. Did you remove the clutch pack and inspect it? Make sure the thrust washers are in the correct places)one behind basket and one behind inner hub boss and that the fibers were not worn? I know you said it was new but i know if the clutch is worn it will be thinner also making for difficulty in getting it adjusted correctly. also you can test it out once pressure plate is tight before you add fluid and put cover on. Dont start it obviously but just pull clutch in and see how it spreads the plates when pushed. Quote
rjdgriff Posted March 5, 2014 Report Posted March 5, 2014 Get ahold of jds, see if he can make you a rotor guard that will work with the stock swinger Quote
lowidenfast Posted March 5, 2014 Author Report Posted March 5, 2014 Here is the clutch assembly. I did not remove it. I just had a friend who is a mechanic come by (he has also owned and built banshees) and he immediately said that the cable is way too long. In his opinion, it could not have stretched this much and has to be the wrong cable. I'm going to remove it and swing by the local motorcycle shop tomorrow on my lunch break. I have to get a new perch anyway because the threads are gone on the end Quote


Recommended Posts
Join the conversation
You can post now and register later. If you have an account, sign in now to post with your account.