


Sheedawg28
-
Posts
408 -
Joined
-
Last visited
-
Days Won
6
Content Type
Profiles
Forums
Events
Gallery
Store
Posts posted by Sheedawg28
-
-
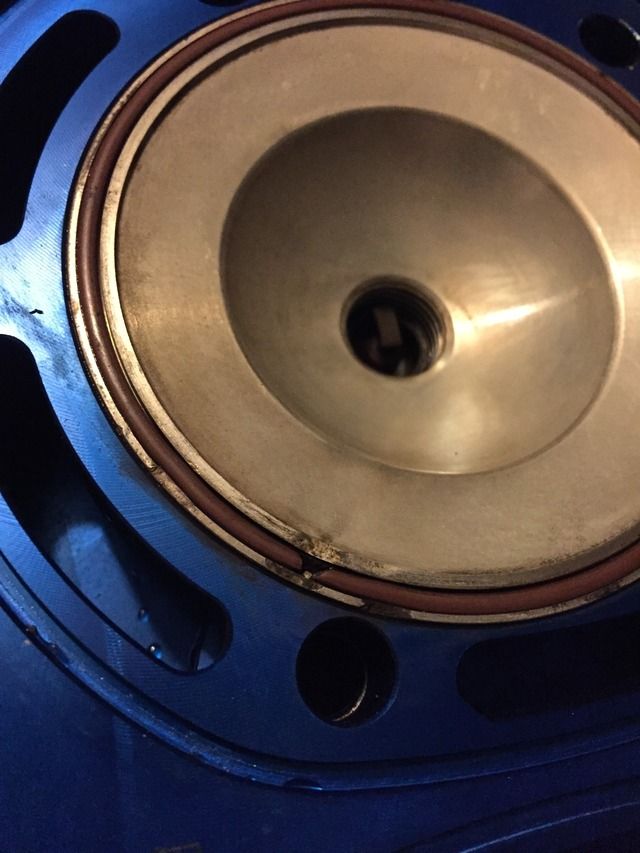
So your saying to get new domes and I should be fine? It is slightly dinged right where t happened but on the outside portion if you look closely. I dropped that one ha.Well you need a new dome. I wouldn't bother trying new o rings.
Sent from my SAMSUNG-SM-G890A using Tapatalk
-
haha you seem to be the only one that thinks it's faster with a non beadlock wheel. Taking the bolts off takes literally if even a minute you then flip it over throw it on the bead breaker and it's off in another minute. Throw the new one on and screw the bead back on..literally takes 5 min at most and you don't have to worry about damaging the wheels with spoons.How is changing a beadlock wheel out easier than a non beadlocks wheel? You need a bead breaker for one side anyway, so it would be WAY faster to pop the bead off both than take about 20 bolts out of oe side and have to use a bead breaker on the other side anyway.
You guys obviously don't change tires enough.
-
I wish I knew. Hp2000 gave me some advice. So I'm going to go with a one step colder plug and check the compression after I throw in a new o-ring.Why is this happening?
3 times?? That's excessive
-
Where that happened it looks like a little cross almost next to the stud.. See it?Eh, what is the surface of the cylinder like?

-
This damn beezy for the 3rd time
-
Do the beadlocks serve any real purpose? Other than keep it on the bead lol
So like Bennett said they definitely will take a beating a lot better than your average wheels. I've also slightly popped the bead off regular wheels from sliding into a corner and catching a fat rut which beadlocks help with. And if you think you can swap out tires quick with non bead lock wheels you should see how quick that's doable with beadlocks and only having to pop the bead off on one side. I guess I could add in here also that unlike regular wheels where if you do happen to bash the lip with a rock you can always replace the ring. I don't rock them in the front since I haven't felt it be necessary since I don't through as many tired as the rear and if I do bang the fronts up they're pretty cheap but these rolled lips on the DWT's have held up to some good sideways bands into rocks in the little trail I riding I've done with them.
-
I was just being a sarcastic smart ass you damn fools...
I would try and use that excuse also after looking like a dit ditty
-
 2
2
-
-
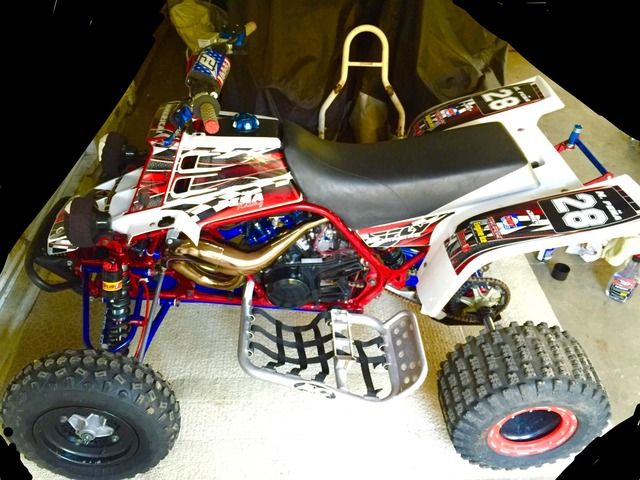
Your bike sits so wide I have polished rims right now but I think I'm going to ditch them
It's at the legal limit for Mx racing and I wouldn't have it any other ways it's helped it tremendously. I'm not big on chrome or polish so I'd definitely agree with you ditching them haha.
-
And your a-arms are +2 +1? And what offset are you running on the wheels sorry for all the question I'm just curious
No worries man ask away. The arms are +3 +1 with 4+1 offset wheels in the front and 3+5 in the rear.
-
What size swingarm are you running?
That's a -2 from JL engineering.
-
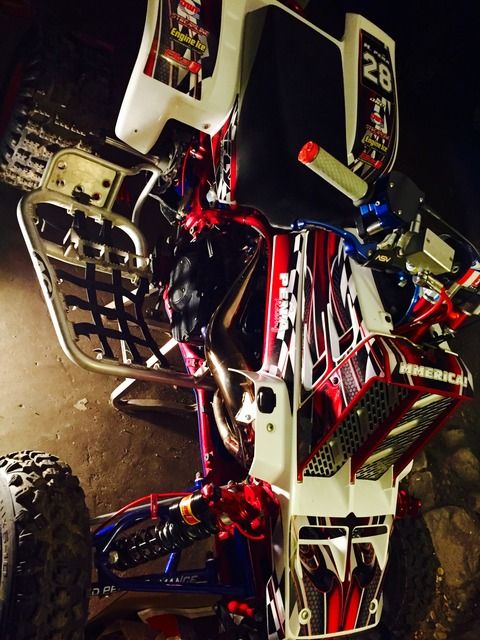
are those pipes gold?
Damn bigweav was on the money with the color ha. Yea they're a bit goldish they were a tad bit more chrome looking before but they've always had that goldish hint to them and became more noticeable the first day I ran them.
-
1
-
-
LOL. I said you had a cool bike, I'd be happy to take a picture of my swing arm for you though? Let me know.
Haha what sheerider said. It'll probably be someone else's picture or turn out looking so edited it looks fake ha. Here since you didn't like the last one. I edited the edges here for you..looks sweeter eh?
-
2
-
-
My favorite build so far can't wait to get some parts in to start mine, whats your opinion on the JD Performance arms?
Make sure you start a build thread so we can check it out. Well so far they've been good to me and have held up really well to the little abuse I've put them through. My only issue was the mount that the bottom bolt, bolts through was misaligned just a cunt hair so I had to drill the hole a tiny bit to get it to fit other than that, solid.
-
Cool bike, but pictures definitely aren't your strong suit.
Well let's see what you got of your bike big shot?
-
Sure, here's the latest one I have.Can you post a pic of the whole bike?
-
1
-
-
Working on piecing some goods together.
-
Keep the updates coming, good work so far.
-
I never understood the guys who run crazy high wattage LED lights on high horsepower bikes.. Do you really ride your bikes at night to its full potential or just laze easy nighttime riding?
That's like me asking if you guys in New York are ever on dirt and not wheeling or burning out at stop lights. Can't speak for the rest of the guys but apprently you've never watched a baja 1000 race as it goes into the night.
-
1
-
-
Cool I just orderd the same kit from JL I just floated my stator that's why I was asking I haven't ran my lights yet also waiting on the kit
For sure man you'll like it definitely a solid set up!
-
Is you stator floated in this pic?
It is but that doesn't matter as its running off AC power which is why I had to keep the revs up to get it as bright. Once I get the other rectifier and battery pack and plug it in, then it'll be running off DC power and I won't have to worry about having to rev it to get them as bright and even switch them on without the bike running.
-
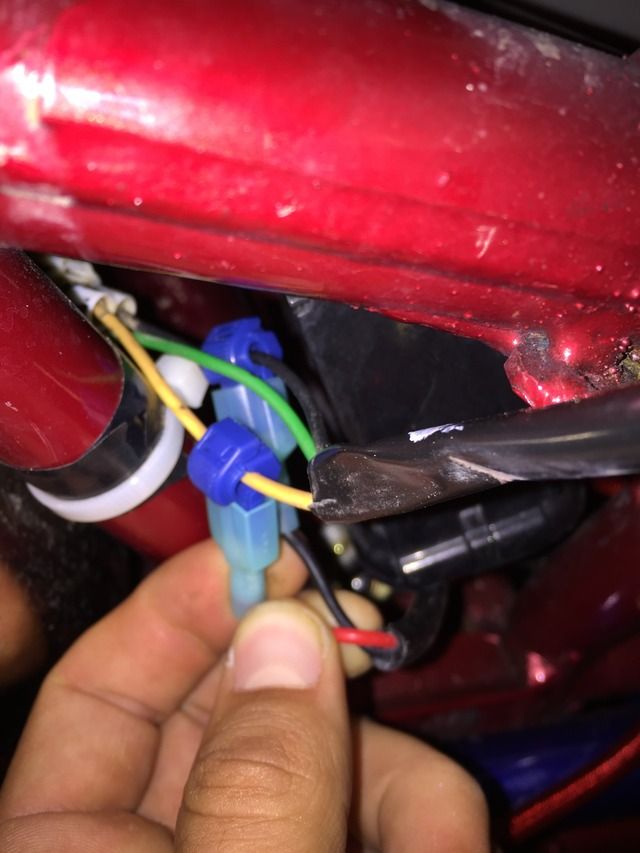
ugh t taps. worst thing made, ditch those things and do a proper wiring job.
Haha did you not read what I said? "I'm going to be changing up this set up" therefore it's only temporary.
-
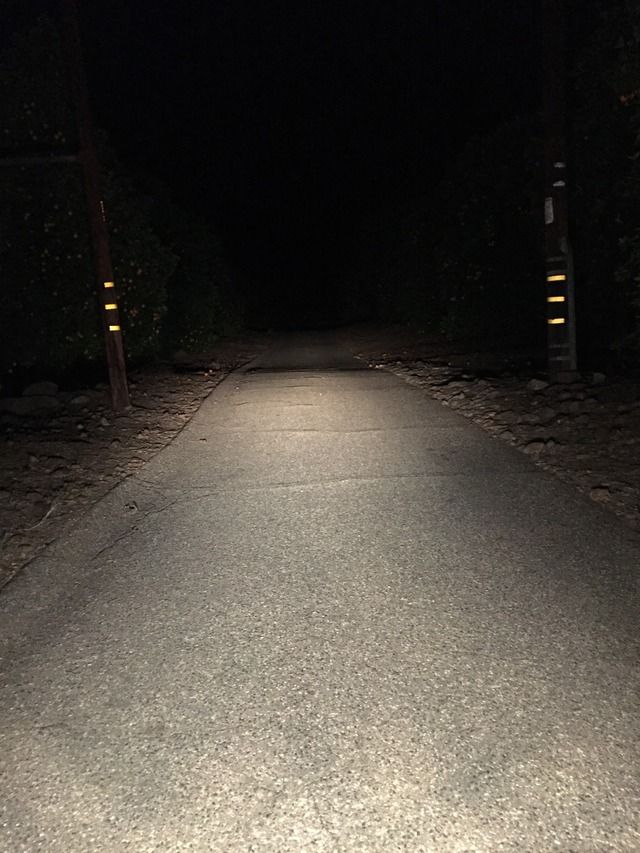
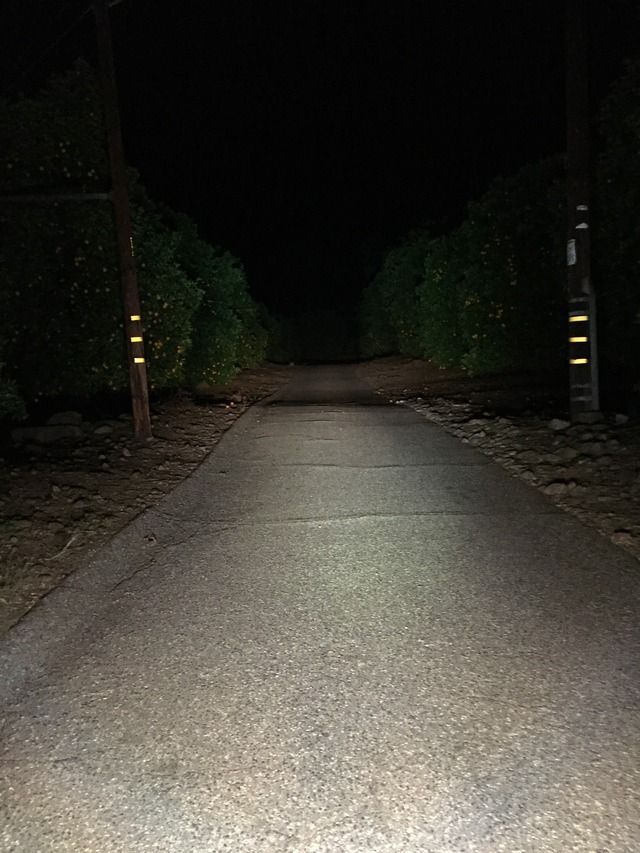
So finally got around to testing out the bumper with the integrated LED light bar. I should have the reg/rectifier here soon so I figured I would mount it for those of you that just want to mount the bumper with the integrated LED light bar without it solely. Of course the light bar isn't as bright as it gets since it's still running off AC power in the 2nd picture facing the quad, so you have to rev it up to get it to its full brightness which I couldn't do at the same time. Here's a picture of how easy it is to install. I used the yellow wire since that's for your brights so the light bar is only on when I turn the high's on but you could also run 2 wires from the positive wire off the LED bar and plug it into the green for when you turn on your low's and the other to the high's, this way the light bar is always on but since I'm going to be changing up this set up I only used just the wire off the LED bar and tapped into the yellow wire which is high's. Anyways here's a picture of that, I used T-tap wire connectors for easy of instal instead of soldering them in..if you decide to do this as your permanent set up I'd wrap it in electrical tape to keep water and debri out.

Now this picture is with the only the stock lights on low but I'm revving the bike to get it to its maximum wattage output (brightest)
This is the money picture now, stock lights set on high which turns on the light bar and I'm also revving it up to get it to its peak output here once again for good comparison. The picture doesn't don't justice of course but you all get a good idea of how much nicer it is.
-
3
-
-
So there was a slight snag with the bracket but nothing serious it just kept it from fitting completely flush but it's all good and fixed now I should have it back either today or tomorrow. I also sent JL engineering my AC racing grab bar to add some color.

-
Dig the color scheme


Manny's MX build
in General Banshee Discussion
Posted