mike0chek Posted September 24, 2015 Report Share Posted September 24, 2015 (edited) starting to look real good man Edited September 24, 2015 by mike0chek Quote Link to comment Share on other sites More sharing options...
AAlamo Posted October 30, 2015 Author Report Share Posted October 30, 2015 Starting to finally come together. Radiator mounted and plastics cut to fit the radiator in them without raising the plastics from their normal mounting positions. Also bought a steering stabilizer and I think I am going to mount it upside down behind the steering stem since it normally goes where the radiator is. This will also bring the point where it bolts to the stem at lower than if it was not turned upside down. Getting a custom upper a arm made to clear the pipes, it will look similar to a banshee upper arm. That way I can still run a different set of pipes down the road with no modification. Motor is being mounted this weekend, planning on finishing this project before thanksgiving to make it to pismo! 1 Quote Link to comment Share on other sites More sharing options...
AAlamo Posted October 30, 2015 Author Report Share Posted October 30, 2015 4 Quote Link to comment Share on other sites More sharing options...
mike0chek Posted October 30, 2015 Report Share Posted October 30, 2015 that hood hides the rad nicely Quote Link to comment Share on other sites More sharing options...
sheerider11 Posted October 30, 2015 Report Share Posted October 30, 2015 If youre going to run that hood is cut the plastic lower to expose the rad more 1 Quote Link to comment Share on other sites More sharing options...
AAlamo Posted October 30, 2015 Author Report Share Posted October 30, 2015 If youre going to run that hood is cut the plastic lower to expose the rad more I'll be running a tto temp guage so I will do a comparison between having the rad scoop on and off. If it's too hot with it on, I will cut the plastic lower. I might even figure out a way to mount a fan in front of the radiator if I can't get enough airflow. Quote Link to comment Share on other sites More sharing options...
camatv Posted October 30, 2015 Report Share Posted October 30, 2015 with mine the plastic is raised up and allows a lot of air in there overall. but its really hard to tell. i DID have a blingstar bumper on it and it would get really hot. after trying a few things and having the same issues i removed the bumper and it cooled right down. even slow trails its fine now. i think the big plate with holes in it were slowing it down too much. when the bike is in a wheelie the nose scoops up air.. BUT the way you did the oem i was going to do. i would cut channels in the oe plastic and then maybe cut out the hood also. thats what i meant by another yamaha product nose section cover. they have rad cuts in them already and should look nice.. i'm going to try that on the next one. on remaking the upper a-arm maybe a j- arm type setup? just rember the ball joint needs to be in the same place it is now. moving it at all is going to change steering geo and fuck a bunch of stuff up. Quote Link to comment Share on other sites More sharing options...
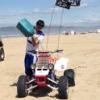
AAlamo Posted November 2, 2015 Author Report Share Posted November 2, 2015 Mocked up! Quote Link to comment Share on other sites More sharing options...
mike0chek Posted November 2, 2015 Report Share Posted November 2, 2015 Mocked up! nice work! Quote Link to comment Share on other sites More sharing options...
camatv Posted November 7, 2015 Report Share Posted November 7, 2015 check your swingarm piviot to sproket centerline.. motor might be to high. Quote Link to comment Share on other sites More sharing options...
AAlamo Posted November 7, 2015 Author Report Share Posted November 7, 2015 check your swingarm piviot to sproket centerline.. motor might be to high. Yeah I agree it needs to come down about an inch or so. The mounts were only tacked on so it won't be too hard to do. Sprocket center should be even with swing arm pivot center correct? Quote Link to comment Share on other sites More sharing options...
Deadbeat Posted November 7, 2015 Report Share Posted November 7, 2015 who makes that steering damper 1 Quote Link to comment Share on other sites More sharing options...
AAlamo Posted November 7, 2015 Author Report Share Posted November 7, 2015 who makes that steering damper Found it on eBay for like 180 bucks, custom cnc products was the guy's name I think Quote Link to comment Share on other sites More sharing options...
Deadbeat Posted November 8, 2015 Report Share Posted November 8, 2015 nice looking bit of kit Quote Link to comment Share on other sites More sharing options...
AAlamo Posted November 27, 2015 Author Report Share Posted November 27, 2015 Got the bike running and put together. Thought I was chasing a jetting issue while I was in Pismo with it, but turns out it is most likely electrical. Misfiring and dying when the bike gets up to operating temp. Will have to tear apart when I get the chance, but for the little time that it was running, it ran like a raped ape. I'm really happy with how well it handles and I would do it all again if I got the chance. Just a heads up for those that plan to do this conversion, do your homework. It takes hours and hours and hours of measuring cutting and fabricating on the frame to get everything to fit just right. Here's some pics of the night I got everything assembled. Stay tuned for some videos and also paint and Powdercoat. It only has some shitty paint and primer so that it wouldn't rust in Pismo. Hope you guys like it! Quote Link to comment Share on other sites More sharing options...


Recommended Posts
Join the conversation
You can post now and register later. If you have an account, sign in now to post with your account.